Tesla Guides · Updated April 2026 · By BASENOR Product Testing Lab
Tesla Model 3 Door Seal Problems: Why They Happen and How to Fix Them
Most Model 3 door-seal complaints are not one single failure. In our installs, the usual causes are uneven seal compression, window-to-seal pressure, or missing secondary sealing around the door, frunk, and trunk edges.
Bottom Line Up Front
Fix the diagnosis first: if the noise changes when you press the window glass, start with window/seal alignment before adding more rubber.
Where a door seal kit helps: a secondary seal can reduce wind paths, dust on the sill, and splash residue after washing on 2016-2024 Model 3.
Real tradeoff: extra rubber can make doors feel firmer for the first few days, and a poor install can trap water if it covers drainage paths.
First, match the symptom to the likely cause
Door-seal issues often sound similar from the driver seat, but the fix is different. A sharp whistle near the A-pillar is usually not the same problem as dusty rocker panels after a dry commute or water drips after a pressure wash.
| Symptom | Likely source | First check | Best next step |
|---|---|---|---|
| Whistle above 45 mph | Window-to-seal pressure or glass-run seal | Paper-pull test at window edge | Service/window adjustment first |
| Dust line on door sill | Gap at lower secondary seal | Compare left vs right sill after same drive | Clean channel, then add secondary seal |
| Water drips after washing | Seal path or blocked drainage | Inspect after gentle hose test | Do not cover drain paths |
| New rubber smell or lifted adhesive | Surface prep or stretched install | Check adhesive contact at corners | Re-clean, warm, and re-seat edge |
Why Model 3 door-seal problems happen
Uneven factory seal compression
Tesla’s service manual treats the primary body-side seal as a separate service part and calls for it to be evenly distributed around the perimeter. If one section is compressed harder than the opposite side, you can hear air at speed even when the rubber looks intact.
Window or glass-run alignment
The frameless Model 3 window has to meet the upper seal with enough pressure. If the glass sits slightly loose, adding a body-side rubber strip will not solve the sharp whistle. That is why we test the window edge before installing a kit.
Missing secondary sealing
The Model 3 has several air and splash paths: door perimeter, lower sill, trunk, and frunk. A secondary seal kit can close the path where dust or splash reaches the sill, but it should never be used to mask a damaged factory seal.
Dirty or wet adhesive channel
Adhesive rubber fails when installed over wax, silicone dressing, road film, or moisture. The first 24 hours matter: stretched rubber and cold adhesive are the two most common reasons a corner lifts later.
Our 10-minute diagnostic before installing anything
- Paper-pull test: close the door on a narrow paper strip at the upper window edge. The grip should feel similar from front to rear and left to right.
- Painter-tape road test: temporarily tape one suspected gap, drive the same route, and remove the tape. If the sound disappears, you found the path.
- Water-path check: after a gentle hose rinse, open the door and look for the first wet line. Do not diagnose from a pressure washer blast.
- Side-by-side comparison: compare driver door, passenger door, rear doors, trunk, and frunk. One noisy door usually points to fitment; all doors usually points to missing secondary sealing or tire/road noise.
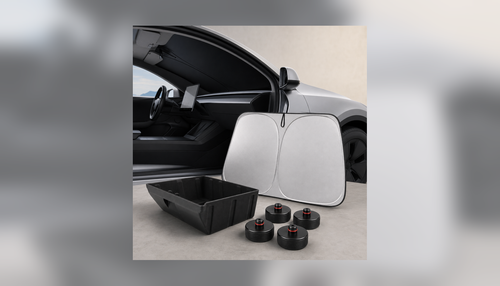
When the BASENOR Model 3 door seal kit makes sense
Use a secondary kit after you confirm the problem is an air, dust, or splash path around the door body rather than a loose frameless window. For 2016-2024 Model 3 owners, our kit is cut for the door, trunk, and frunk sealing routes that typically collect dust or carry wind paths into the cabin.

BASENOR Door Seal Kit for 2016-2024 Tesla Model 3
Verified active product coverage during this run: 2016-2024 Tesla Model 3 door seal kit, with product page and image URL returning reachable status.
Best for: lower sill dust, wind paths around the door perimeter, and reducing splash residue after washing.
Not for: damaged factory seals, misaligned glass, post-collision door fitment, or a Highland-only fitment promise beyond the live catalog.
Install guardrails that prevent new problems
A door seal kit is simple, but simple is not the same as careless. We install on a clean, dry surface, test-fit every section first, and avoid stretching the rubber around curves. Stretched rubber tries to shrink back, which is why corners lift after a hot day.
- Clean twice: remove dust first, then wipe adhesive paths with an appropriate residue-free cleaner and let the channel dry fully.
- Do not stretch: place the seal in a relaxed shape. Compression should come from the door, not from pulling the strip tight.
- Leave drainage paths clear: extra sealing should redirect splash, not trap standing water inside the lower door/sill area.
- Check closure force: firmer closing is normal at first, but the door should latch without slamming.
- Inspect after the first rain or wash: open each door and confirm water exits instead of pooling against the new strip.
When Tesla service should handle it instead
If the paper-pull test shows a loose window edge, if one door sits proud of the body, or if wind noise started after body work, treat the add-on seal as the wrong first fix. Tesla’s own service documentation separates primary body seals, front secondary seals, and rear secondary seals into service procedures, which is the clue: fitment can be mechanical, not just “needs more rubber.”
We would book service before adding a kit when the factory seal is torn, the glass does not index correctly, water enters the cabin, or the door needs obvious alignment.
One more practical clue: if the sound changes after a temperature swing or after the car sits in direct sun, inspect adhesive-backed strips and factory rubber for uneven compression. Rubber that was installed under tension tends to pull back at the tightest curve first; factory seals usually fail more gradually, with flattened spots or visible gaps rather than one lifted corner.
FAQ
Does this fit the 2024 Model 3 Highland?
The current BASENOR product title says 2016-2024 Tesla Model 3. We do not extend that claim beyond the live product catalog. If your 2024 vehicle is Highland, confirm fitment on the product page before ordering.
Will a door seal kit stop all Model 3 wind noise?
No. It can reduce air paths around the door perimeter, but tire noise, mirror turbulence, glass alignment, and factory seal damage are different causes. Diagnose first.
Can extra door seals cause water problems?
A poor install can. The risk is covering drainage paths or trapping water along the lower edge. That is why we inspect after the first rain or wash before calling the job finished.
Why are my doors harder to close after installation?
New rubber adds compression. A slightly firmer close can be normal during the first few days. If the door requires slamming, the strip may be mispositioned or too thick at one contact point.
Should I replace the factory seal or add a secondary seal?
Replace or service the factory seal if it is torn, loose, or uneven. Add a secondary seal when the factory fitment is sound but you want less dust, splash, or wind path around the door perimeter.
Sources
Fix the air path without guessing
Run the quick checks first. If your Model 3 has a real door-perimeter air, dust, or splash path, use the BASENOR 2016-2024 Model 3 door seal kit and install it without stretching or blocking drainage.
Shop the Model 3 door seal kitAuthor: BASENOR Product Testing Lab — our team tests Tesla accessory fitment by generation and turns owner pain points into practical installation guides.
Last updated: April 2026, with verified Tesla service-source links and current BASENOR Model 3 door-seal product coverage.