Tesla Guides · Updated April 2026 · By BASENOR Product Testing Lab
Tesla Home Charging Setup Guide for New Owners
A good Tesla charging setup is not just “buy the fastest charger.” New owners need three decisions first: where the car sleeps, what power is legally available, and how the cable stays off the floor after 300 nightly plug-ins.
Bottom Line Up Front
Start simple: if you drive modest daily miles, verified access to a regular outlet or nearby public charger can bridge the first weeks while you plan the permanent setup.
Upgrade only after permission: renters and apartment owners should solve assigned parking, landlord/HOA approval, electrical capacity, and insurance questions before buying or mounting hardware.
Where BASENOR fits: our current product anchor is cable management — holders and wall organizers that keep the charging cable off the floor. We do not claim to sell the charger, adapter, or extension cord.
The 4-question setup decision tree
Before you install anything, map the charging problem like an owner, not like an electrician shopping list. The U.S. Alternative Fuels Data Center separates home charging from multifamily charging because the constraints are different: a private garage usually means electrical capacity and installation planning; an apartment usually means permission, shared infrastructure, and parking rules.
Where does the Tesla sleep?
Garage, driveway, assigned apartment stall, shared lot, or street parking. If you cannot reliably park near power, a home charging product will not solve the real problem.
Who controls the outlet?
Homeowners can call an electrician. Renters need written permission. Condo owners may need HOA approval and proof that the charger meets local safety rules.
How many miles must recover overnight?
A low-mileage commute can tolerate slower charging. High daily mileage, winter range loss, or rideshare use usually pushes owners toward a dedicated Level 2 plan.
Where will the cable live?
Cable storage sounds minor until it drags through water, kinks at the connector, or becomes a trip hazard. That is the accessory layer BASENOR can help with.
Home garage vs apartment parking: the setup is different
| Scenario | First move | Main constraint | BASENOR accessory role |
|---|---|---|---|
| Private garage | Check panel capacity with a licensed electrician | Electrical load and mounting location | Wall organizer keeps cable loop off the floor |
| Driveway | Confirm weather-safe outlet/charger placement | Cable path and water exposure | Holder reduces ground contact when mounted correctly |
| Apartment / condo | Ask property manager or HOA in writing | Permission, cost allocation, insurance | Only after mounting permission is granted |
Clean Cities’ multifamily housing guidance is blunt: apartment charging is an infrastructure and ownership problem as much as a hardware problem. That is why we would rather see a new owner secure permission and a safe electrical path before spending money on accessories.
Our first-week charging plan for a new Tesla owner
The first week is when most owners overbuy. We would not start by ordering a random bundle of adapters. We would document the real driving pattern, then decide whether the car needs faster overnight recovery or just a cleaner parking routine.
Day 1: confirm your home parking position and measure the cable path with the car parked normally. Open the driver door, walk around the front and rear, and check whether the cable crosses a walking path. If the cable touches the tire path or sits where rainwater collects, treat cable routing as part of the setup, not a cosmetic detail.
Days 2-3: track actual daily energy use instead of guessing from range anxiety. A new Tesla owner who drives 20-35 miles per day has a different charging requirement from a rideshare driver, mountain commuter, or owner parking outside in winter. The charger decision should follow that pattern.
Days 4-5: decide whether the setup is temporary or permanent. Temporary setups should stay removable and lease-safe. Permanent setups should be mounted cleanly, cable-supported, and easy for another household member to use without dragging the connector across the floor.
Days 6-7: install the organization layer only after the charging location is settled. That is when a BASENOR cable holder makes sense: not as a substitute for electrical planning, but as the daily-use finish that keeps the connector in one predictable spot.
Apartment and condo owner script: what to ask in writing
For renters, the safest charging setup starts as a written request. The AFDC renter-policy material exists because this is not only a product question; it is a permission, code, insurance, and cost-allocation question.
Parking control
Ask whether your assigned space can be modified, whether the charger can be mounted nearby, and what happens if parking spaces rotate.
Electrical work
Ask whether a licensed electrician is required, who selects the contractor, and whether the building has spare capacity for the proposed circuit.
Billing
Ask how electricity is metered and billed. Shared meters create disputes if the monthly cost is not defined before installation.
Removal
Ask whether the hardware stays with the property, whether wall holes must be repaired, and whether a cable holder is allowed on the same mounting surface.
We would send that request before buying any wall-mounted accessory. If the property manager says no to mounting, use a removable daily routine instead of drilling first and apologizing later.
Level 1 vs Level 2: how to think about speed without overbuilding
Level 1 charging is slow but simple; Level 2 charging is faster but needs a more serious installation decision. The right answer is not universal. It depends on parking reliability, commute distance, climate, and how often the car returns home with a low battery.
We use a practical rule in our lab notes: if the car regularly sits overnight and only needs modest recovery, start with the simplest safe setup and watch a full week of usage. If the car frequently needs a large overnight recovery window, or if winter driving cuts the margin too close, start planning Level 2 with a licensed electrician.
The cable-management decision is separate from the electrical decision. A cable holder can improve either setup because the owner still plugs and unplugs the car repeatedly. But it should not hide a bad cable path. If the cable must run under a garage door, across a sidewalk, through standing water, or across a shared hallway, the route needs to be redesigned before accessories are added.
Mounting notes from our accessory testing bench
A charging cable is heavier and less forgiving than most interior accessories. The holder is only as good as the wall behind it. On drywall, use the correct anchors or find a stud. On concrete or brick, use hardware that matches the wall material. In a rental, do not assume adhesive mounting is acceptable; heat, dust, and cable weight can make weak mounting fail.
Height matters too. Mount the holder high enough that the cable loop clears the floor, but low enough that shorter drivers can replace the connector without stretching. If the cable naturally twists when parked, rotate the loop direction before mounting. The best setup is boring: plug in, unplug, return connector, no cable on the ground, no one steps over anything.
That is also why we avoid claiming a cable organizer is a performance upgrade. It is a consistency upgrade. Over months of ownership, consistency is what keeps the charging corner clean and reduces the chance that someone leaves the connector where a tire, shoe, or puddle can hit it.
Level 1, Level 2, and public charging: what to use in the first 30 days
Most new Tesla owners do not need to solve the final charging setup on delivery day. What they need is a safe first-month plan. Start with your real weekly mileage, then match the charging source to that need. If your commute is short and the car sits overnight, a standard outlet may be enough while you collect quotes and approvals. If the car regularly returns home with a low state of charge, or if winter, hills, highway driving, or rideshare use are part of your routine, plan for a dedicated Level 2 setup instead of hoping slow charging will catch up.
The practical rule is simple: do not let the car's charging limit become a daily calendar problem. A setup is working when you can plug in, walk away, and wake up with the range you expected. A setup is not working when you keep moving the car at night, waiting for a shared charger, or depending on a public station for normal weekday driving. Public fast charging is excellent as a backup and for trips, but it is a poor substitute for predictable home or workplace access if you can avoid it.
First-month charging plan
- Week 1: use the safest available charging source and log how much range you actually recover overnight.
- Week 2: ask for quotes or property approval only after you know whether slow charging is truly insufficient.
- Week 3: choose the permanent cable path and mounting wall, not just the outlet location.
- Week 4: add cable management once the electrical and permission decisions are stable.
This sequence prevents a common mistake: buying accessories for a temporary parking location. A cable holder is useful when the charger location is fixed. It is not useful if the outlet moves, the landlord rejects wall mounting, or the car changes parking spaces every week.
Apartment and condo charging permission checklist
Apartment charging fails most often because the owner asks for “EV charging” too broadly. Property managers need a specific, low-risk proposal: where the car parks, what equipment will be installed, who pays, who owns it, and who removes it later. The AFDC renter-policy guidance exists because these questions are legal and operational, not just technical.
Confirm the stall is yours to modify
Assigned parking is easier than first-come shared parking. If the stall can change, ask whether the property can assign an EV-ready space before you pay for any hardware.
Ask how electricity will be billed
Some properties require a dedicated meter or networked charger. Others bill a fixed monthly fee. Do not assume a shared garage outlet is free to use.
Require licensed electrical work
A written proposal from a licensed electrician lowers friction because it answers panel capacity, conduit path, permits, and code-compliance questions.
Decide what happens when you move
Clarify whether the equipment stays, who restores the wall, and whether the next tenant can use the setup. This matters before any holes are drilled.
For renters, BASENOR’s recommendation is intentionally conservative: do not mount even a simple cable organizer until the property approves the wall or post where it will live. If approval is limited to freestanding storage, keep the cable off walking paths and avoid any setup that looks permanent without permission.
Garage layout: choose the wall before you choose the accessory
A clean home charging setup has three zones: the outlet or wall connector, the cable loop, and the connector resting point. Those zones should be close enough that the cable does not stretch across the car, but not so cramped that the connector bends sharply every time you plug in. Before mounting anything, park the Tesla exactly where it will sit, open the charge port, and trace the cable path with painter’s tape or a rope. That five-minute test reveals whether the charger belongs on the front wall, side wall, or a post.
Keep the cable loop at a comfortable hand height. If it is too low, it drags and collects grit. If it is too high, shorter drivers will drop the connector or yank the cable downward. The best position usually lets the connector return to its holder in one motion after unplugging. For families, place it where the shortest regular driver can use it without stretching.
Also think about the non-charging days. Bikes, strollers, storage bins, and trash cans tend to migrate into the garage walkway. A cable-management setup should reduce clutter, not create a new obstacle. If the mount sits near a door, leave enough clearance that people do not brush the connector with bags or jackets. If the setup is outside or in a carport, prioritize weather exposure and splash direction before appearance.
The weekly routine that keeps the setup safe
Charging accessories are not install-and-forget items. Once a week, check that the cable has no sharp kinks, the connector is seated cleanly, and the holder has not loosened. After heavy rain, snow, or a garage washdown, look for water pooling near the cable path. If the cable ever feels warm in normal use, stop and have the electrical setup checked; a wall organizer cannot compensate for a weak outlet, poor connection, or overloaded circuit.
For apartment owners, add one more habit: keep the area looking tidy. A neatly stored cable reassures neighbors and property staff that the charging setup is controlled. A cable on the floor invites complaints even if the electrical work is approved. That is the real value of a cable organizer in shared or visible spaces — it makes the setup look intentional and reduces the small daily annoyances that turn into property-management friction.
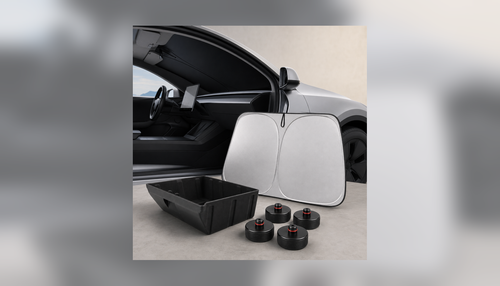
Cable-management setup we actually recommend
Once the charging location is approved, the best low-cost upgrade is cable management. It does not charge the car faster. It keeps the daily routine repeatable: connector goes back to the same place, cable stays off the ground, and the parking area looks intentional instead of improvised.

BASENOR Charging Cable Holder Organizer for Tesla Model S/3/X/Y
Best for: owners who need a compact wall-mounted place for the connector and cable loop after every charge session.
Fitment: Model S / 3 / X / Y. Price band: $.
Real tradeoff: Small wall footprint, but it needs a clean mounting surface and permission if you rent.

Tesla Wall Connector Cable Organizer (Model 3/Y/S/X) - Heavy Duty Wall Mount | BASENOR
Best for: a cleaner garage or carport setup where the charger location is already fixed and the cable needs a durable parking spot.
Fitment: Model 3 / Y / S / X / Cybertruck cable-management setup. Price band: $.
Real tradeoff: Heavier-duty mount, but it only helps after the outlet or Wall Connector location is already approved.
Five mistakes we would avoid
- Buying accessories before permission: apartment owners can get blocked by lease, HOA, insurance, or electrical rules.
- Running a cable across a walking path: it creates a trip hazard and trains everyone to step on the cable.
- Using an extension cord as a permanent plan: solve outlet location properly instead of hiding risk with a longer cable.
- Letting the connector sit on the floor: dust, moisture, and tire contact add wear over time.
- Mounting into weak drywall: use the correct anchors or studs for the wall material; a falling cable holder is worse than no holder.
Seasonal and household checks before you call it finished
A setup that works in April can feel different in January or July. Cold weather can increase energy use, wet floors can make cable routing messier, and a second driver in the household can expose a mounting height that only worked for one person. We like to test a charging corner for seven normal nights, then one rainy or car-wash day, before calling the layout finished.
Watch for three small signals. First, the cable should return to the same loop without twisting the connector. Second, the connector should not hang so low that it can touch the floor, tire, or puddle. Third, the route from driver door to house door should not require stepping over the cable. If any of those fail, adjust the cable holder location before drilling more holes.
For families, put the holder where the shortest regular driver can return the connector with one hand. For garages used as storage, leave clearance for trash bins, bikes, and strollers. For outdoor or carport setups, keep the organizer inside the approved protected area and do not use the product as a weatherproofing substitute. The holder organizes the cable; it does not change the electrical rating of the outlet, charger, or installation.
This is the difference between an accessory and a system. The accessory is the wall holder. The system is the approved power source, safe cable path, repeatable parking position, and a mounting point that still works six months later.
FAQ
Can I charge a Tesla from a regular outlet?
Yes, but it is slow. Treat it as a bridge or low-mileage solution, not automatically the permanent setup. If your daily mileage is high, plan a dedicated Level 2 option with a licensed electrician.
What should apartment Tesla owners ask before installing charging?
Ask who owns the parking space, who pays installation and electricity costs, what insurance is required, whether licensed electrical work is mandatory, and whether the charger can remain if you move.
Does BASENOR sell Tesla chargers?
In the current Shopify catalog checked for this guide, BASENOR’s matching products are cable holders and wall connector organizers, not chargers, adapters, or extension cords. We keep the recommendation inside that boundary.
Is a cable organizer worth it?
It is worth it when the charging spot is fixed and approved. It is not the first purchase if you still do not know where the outlet or charger will live.
Sources
Make the charging spot feel finished
After the outlet, charger, and permission questions are settled, add the simple layer owners touch every day: a secure place for the cable and connector.
Shop BASENOR charging organizationAuthor: BASENOR Product Testing Lab — our team tests Tesla accessory fitment by generation and keeps product recommendations inside verified catalog coverage.
Last updated: April 2026, with product coverage narrowed to verified BASENOR cable-management accessories and public charging sources verified during drafting.