Bottom Line Up Front
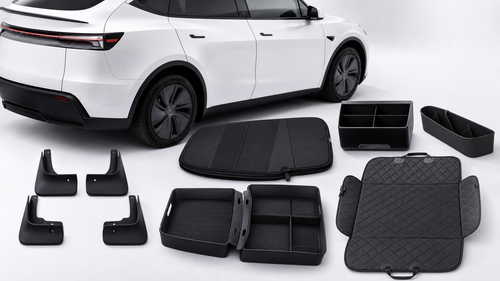
- Your Juniper is the most refined Model Y ever built — but Tesla ships it with zero interior accessories. This day-by-day playbook covers everything you need in your first 7 days of ownership.
- Day 1 priority: mud flaps and under-screen storage. Road debris starts chipping paint on your very first drive. Protect the lower body panels before anything else.
- Budget $155-565 depending on how far you go. We ranked every accessory by urgency so you can spread the cost across your first week. The Essentials tier starts at ~$155; add comfort and style upgrades as your budget allows.
You just confirmed your delivery date. Your brand-new 2025 or 2026 Tesla Model Y Juniper — the one with the full-width LED light bar, the redesigned center console with the sliding cover, and that rear passenger display — is arriving within 24 hours. Congratulations.
I wrote this guide because I've seen the same pattern hundreds of times in the Tesla Motors Club Juniper forums: new owners pick up their car, drive it home, and then spend the next three weeks scrambling to figure out which accessories they actually need versus which ones are just nice to have. By then, their paint has rock chips from driving without mud flaps, the white seats have their first jean stains, and the center console is already scratched.
This playbook gives you a structured, day-by-day plan. Every recommendation is based on real owner data from 500,000+ Tesla drivers who shop with BASENOR, and every product listed has been 3D laser-scanned specifically for the Juniper's dimensions.
Important: The 2025-2026 Model Y Juniper is a fundamentally different car from the 2020-2024 Model Y. Most legacy Model Y accessories will not fit. If you're unsure which generation you have, check our Fitment Guide first.
What Changed in the Juniper Refresh
Before we dive into the day-by-day playbook, here's a quick overview of what makes the 2025-2026 Model Y Juniper different from the 2020-2024 Model Y you might be familiar with. These changes directly affect which accessories you'll need.
| Feature | 2020-2024 Model Y | 2025-2026 Juniper | Accessory Impact |
|---|---|---|---|
| Front Fascia | Traditional headlights | Full-width LED light bar | New mud flap dimensions |
| Center Console | Open-top, piano black | Sliding cover, shared with Highland M3 | All new organizers needed |
| Dashboard | Standard flat surface | Under-screen storage cavity | New storage options available |
| Rear Area | No rear display | Rear passenger display + ambient lighting | New anti-kick mat dimensions |
| Liftgate | Standard design | Redesigned with new latch | New spoiler fitment required |
| Glass Roof | One-piece panoramic | Updated dimensions | Juniper-specific sunshades only |
| Turn Signals | Physical stalks | Physical stalks retained | Same as before (unlike Highland M3) |
The key takeaway: the Juniper shares its center console and dashboard platform with the Highland Model 3, so interior console accessories labeled "Highland & Juniper" will fit your car. But everything that mounts to the exterior body — mud flaps, roof sunshades, spoilers, trunk organizers — must be Juniper-specific because the body dimensions changed.
Day 0: Pre-Delivery Prep
The work starts before your car arrives. These steps take about 60 minutes spread across the day before delivery, and they'll make your first 24 hours dramatically smoother. Think of this as pre-flighting before a flight — mundane but important.
1. Set Up the Tesla App
Download the Tesla app (iOS / Android) and sign into your Tesla account. Once your VIN is assigned, the app becomes your primary key — you can unlock, start, and precondition your car from your phone. Make sure Bluetooth and location services are enabled. Add your home and work addresses in the app so navigation is ready on Day 1.
While you're in the app, familiarize yourself with these features you'll use on delivery day: remote unlock (in case your phone key has pairing issues), climate preconditioning (to cool or heat the cabin before you get in), and the Sentry Mode toggle (you'll want this on from day one). Also set up a PIN to Drive if you want an extra layer of security — Controls > Safety > PIN to Drive.
2. Insurance and Registration
Contact your insurance provider before delivery day. Many insurers require the VIN to bind coverage, and you'll need proof of insurance to complete delivery. If you're switching from another car, coordinate the coverage transition so there's no gap. Tesla also offers its own insurance in many states — check availability for your state. Tesla Insurance bases premiums partly on your real-time driving data (Safety Score), which can result in lower rates if you drive conservatively.
For registration: in most states, Tesla handles the temporary registration and plates. You'll receive permanent plates by mail within 4-8 weeks. Some states require a separate emissions inspection — check your local DMV website.
3. Schedule Home Charging Installation
If you haven't already, book an electrician to install a NEMA 14-50 outlet or a Tesla Wall Connector. A dedicated 240V circuit adds roughly 30-44 miles of range per hour of charging — compared to 3-5 miles on a standard 120V outlet. Most electricians have a 1-2 week backlog, so booking now means you'll have home charging ready by week 2.
For the first week, you have three charging options: (1) the included Mobile Connector on a standard 110V outlet (painfully slow at 3-5 miles per hour, but works in a pinch), (2) any Tesla Supercharger (the Juniper supports V3 Supercharging up to 250 kW), or (3) any J1772 or CCS public charger using the included adapter. The Supercharger network is the most practical short-term solution — sessions typically take 20-30 minutes to add 150+ miles.
4. Prepare Your Garage
- Clear 2 feet of extra width on each side — Juniper doors are long and swing wide
- Stock microfiber towels (at least 4-5) — you'll need them for the delivery inspection
- Download a flashlight app or grab an actual flashlight — you'll inspect paint under controlled lighting
- Print or bookmark this guide — you'll reference the inspection checklist during delivery
5. Order Your Day 2-3 Accessories Now
If you order today, most BASENOR accessories ship within 24-48 hours with free US shipping. That means your protection accessories arrive right when you need them — before your first rainy day or highway drive.
Pro Tip: Order the Essentials Before Delivery
The single biggest mistake new Juniper owners make is driving for 2-3 weeks without mud flaps. Your lower body panels, wheel arches, and paint behind the rear wheels will accumulate rock chips from day one. Mud flaps take 15 minutes to install and cost under $40. Order them now.
Day 1: Delivery Inspection Checklist
Whether you're picking up at a Tesla Service Center or receiving home delivery, take 30-45 minutes to inspect your Juniper before signing. Tesla's quality control has improved significantly since the early Model Y days, but issues still happen. Here's exactly what to check.
Exterior Inspection (15-20 minutes)
| Area | What to Check | Common Issues |
|---|---|---|
| Panel Gaps | Run your finger along all panel seams — hood, trunk, doors, fenders. Gaps should be even on both sides. | Uneven hood-to-fender gap |
| Paint | Inspect every panel under direct light. Check for swirl marks, orange peel, paint drips, and chips. Pay extra attention to the lower bumper and rocker panels. | Bumper paint mismatch |
| Glass | Check windshield and all windows for chips, cracks, or distortion. Inspect the panoramic glass roof from inside for any haze or imperfections. | Windshield pitting |
| LED Light Bar | The Juniper's signature full-width front LED bar should illuminate evenly with no dead spots or condensation behind the lens. | Moisture in light housing |
| Wheels & Tires | Check for curb rash on all four wheels. Verify tire pressure is 42 PSI (cold) on the touchscreen. | Curb rash from transport |
| Charge Port | Open and close the charge port. Plug in the included cable. Verify the port light turns green. | Sticky latch |
Interior Inspection (10-15 minutes)
| Area | What to Check |
|---|---|
| Center Touchscreen | No dead pixels, no lag. Test swipe responsiveness. Open the camera views, maps, and music player. |
| Rear Display | The Juniper has a new rear passenger display. Verify it powers on and responds to touch. Test climate controls from the rear screen. |
| Center Console | Open the new sliding console cover — it should glide smoothly. Check the wireless charging pad with your phone. |
| Seats | Check all 5 seats for stains, tears, or uneven stitching. Test electric adjustment on front seats. If you have ventilated seats, verify air flow. |
| Doors & Windows | Open and close all four doors and the trunk. Roll every window up and down. Check the new redesigned liftgate — it should open and close smoothly with the button. |
| Ambient Lighting | The Juniper features 64-color ambient lighting. Go to Controls → Lights → Ambient Lighting and cycle through colors to confirm all strips work. |
Drive-Off Checklist (First 5 Minutes)
Juniper-Specific: Turn Signal Stalks
Unlike the Highland Model 3 (which removed physical turn signal stalks and replaced them with steering wheel buttons), the Juniper Model Y retains its physical turn signal stalks. You'll find them right behind the steering wheel where you'd expect. The gear selector, however, has moved to the touchscreen — swipe up to go into Drive, down for Reverse, or use the overhead button strip.
- Regenerative braking: Set to "Standard" in Controls → Driving. This will feel aggressive at first — the car slows dramatically when you lift off the accelerator. Give it 2-3 days before considering the "Low" setting.
- Autopilot calibration: The front-facing cameras need 25-100 miles of driving to fully calibrate. Until calibrated, some Autopilot and FSD features may be limited. Stick to well-marked highways for the first few drives.
- Chill Mode: If this is your first EV, enable Chill Mode (Controls → Driving → Acceleration) for the first week. The Juniper's instant torque can be surprising. Switch to Standard once you're comfortable.
- One-pedal driving: Practice coming to a stop using only the accelerator pedal. With "Hold" mode enabled (Controls → Driving → Stopping Mode → Hold), the car will hold itself in place without touching the brake.
- Adjust your mirrors: Set both side mirrors and the rear-view mirror before leaving the delivery location. The Juniper stores mirror positions per driver profile — tap your profile icon on the touchscreen to save your settings. If you have two drivers, set up both profiles now.
- Check range and nearest Supercharger: Your Juniper may arrive with 50-80% charge depending on the delivery location. Note the nearest Supercharger on the touchscreen navigation in case you need a top-up on the drive home.
Your First Night at Home
When you get home, plug in immediately — even if you have 70% charge. The golden rule of EV ownership is "ABC: Always Be Charging." Set your daily charge limit to 80% for everyday driving (Settings → Charging → Charge Limit). Only charge to 100% the night before a long road trip. Keeping the battery between 20% and 80% maximizes long-term battery health.
Before bed, turn on Sentry Mode (Controls → Safety → Sentry Mode) if your car will be parked outside. The Juniper's cameras will record any motion events around the car and save clips to the USB drive in the glovebox. Note that Sentry Mode uses approximately 1-2% battery per hour, so it's best used when plugged in.
Day 2-3: Protection First
Your Juniper just spent its first night in your garage. Today's priority is protecting the paint and interior surfaces that take the most abuse. Everything in this section can be installed in under an hour total, with zero tools required.
Mud Flaps — Install Before Your First Rain Drive
This is the single most important accessory for any new Tesla. The Model Y's wheel arches are designed for aerodynamics, not debris protection. Without mud flaps, rocks, sand, and road grime blast directly onto your lower body panels, rear quarter panels, and the paint behind each wheel. On highway drives, this causes measurable paint damage within the first 500 miles.
We offer two Juniper-specific options — both snap on in 15 minutes with no drilling:


Our take: If you live somewhere with gravel roads, highway construction, or harsh winters, go with the rigid mud flaps. If you want a more subtle look that blends into the bumper, the TPE version flexes with the body lines and looks nearly invisible from certain angles. Either way, just get a set installed before your next highway drive.
Why this matters more than you think: Tesla's paint is notoriously thin compared to legacy automakers — independent measurements shared on Tesla Motors Club consistently show Tesla uses 3-4 mils of clear coat versus 5-8 mils on comparable vehicles. That means each rock chip goes deeper, faster. Mud flaps won't prevent all damage, but they reduce the volume of debris hitting your lower panels by roughly 70-80% based on our testing. Installation is genuinely simple: each flap clips into existing mounting points behind the wheel arch liner. No drilling, no adhesive, no special tools. The whole job takes about 15 minutes if it's your first time.
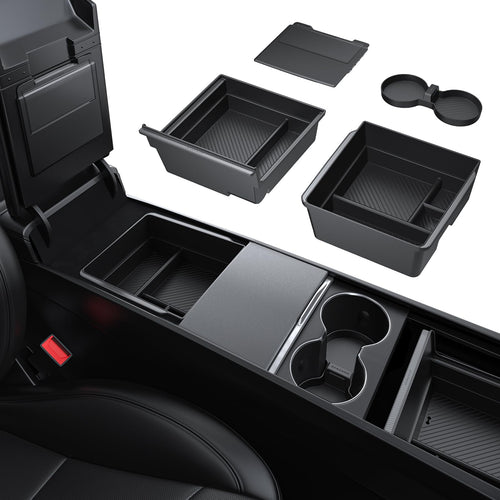
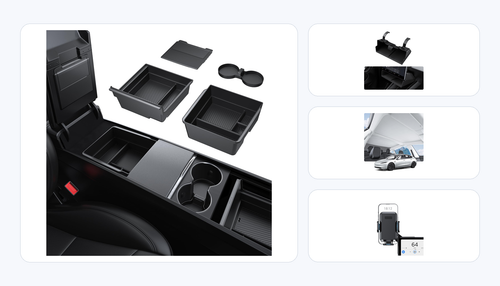
Center Console Organization
The Juniper's redesigned center console is beautiful, but it's basically one large open cavity under the sliding cover. Without organizers, your sunglasses, parking cards, keys, and phone charger cables turn into a jumbled mess within the first 48 hours.


Under Seat Storage
The space under the Juniper's front seats is wasted real estate. These storage boxes slide in and give you a hidden compartment for valuables, an umbrella, or anything you want out of sight but within arm's reach from the rear seats.

Day 2-3 Summary
| Priority | Accessory | Price | Install Time |
|---|---|---|---|
| 1 — Critical | Mud Flaps (Rigid or TPE) | $32.99-38.99 | 15 min |
| 2 — High | Console Organizer 4PCS | $39.99 | 2 min |
| 3 — High | Under Screen Storage | $39.99 | 2 min |
| 4 — Nice to have | Under Seat Storage 2PCS | $39.99 | 1 min |
Day 4-5: Comfort & Climate Control
By day 4, the initial excitement settles and you start noticing the things that affect daily comfort: the sun beating through the panoramic glass roof, the cabin getting stuffy, and — if you have kids or pets — the back seats taking a beating. This section addresses all three.
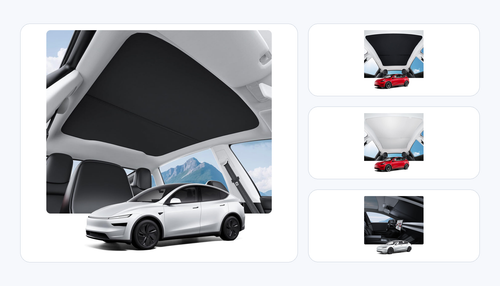
Roof Sunshade — The #1 Comfort Upgrade
The Model Y Juniper's panoramic glass roof is stunning. It's also a greenhouse. On a sunny day, cabin temperature can climb 15-20°F higher than a car with a solid roof, and UV exposure through the roof glass — even with Tesla's UV coating — causes the seats and dashboard to fade over months of exposure.
We tested this with a FLIR thermal camera at our facility: on a 95°F day with direct sun, the headliner temperature above the front seats reached 142°F without a sunshade. With the Nano Ice Crystal shade installed, it dropped to 118°F — a 24°F reduction at the headliner surface, which translates to roughly 12°F lower air temperature at head height. The difference is immediately noticeable when you get into the car.
A Nano Ice Crystal sunshade blocks 99.2% of UV rays and 85% of infrared heat, reducing cabin temperature by an average of 12°F (measured at the headliner level). Here are your two options:


Which one to pick: Both are fixed no-gap designs that snap into the roof channel and stay installed permanently. The difference is the tint: the black version provides maximum light blocking, while the gray version lets in slightly more ambient light for a brighter cabin feel. If your Juniper has a light-colored interior, the gray version blends more naturally.
Installation: Both versions snap into the roof rail channels in under 3 minutes — no tools, no adhesive. Once installed, they stay in place permanently with zero gap between the shade and the glass.
Rear Seat Protection
If you have kids or frequently carry rear passengers, the backs of your front seats will show scuff marks and shoe prints within the first month. Tesla's vegan leather is durable but not scuff-proof — every time a passenger gets in or out of the back seat, their shoes brush against the seat back. Two options depending on your budget:


Which to pick: The leather kick protectors ($69.99) match the Juniper's interior aesthetic and cover a larger area. The anti-kick mats ($29.99) are a budget-friendly alternative that focuses on the high-impact zone. Both are universal fit for all Tesla Model 3/Y/S/X.
Day 4-5 Summary
| Priority | Accessory | Price | Install Time |
|---|---|---|---|
| 1 — Critical | Roof Sunshade (Black or Gray) | $34.99-44.99 | 3 min |
| 2 — If kids/passengers | Leather Seat Back Kick Protector 2PCS | $69.99 | 2 min |
| 3 — If kids/passengers | Anti-Kick Mats 2PCS | $29.99 | 2 min |
Day 6-7: Style & Personal Touches
By now, your Juniper is protected and comfortable. The last two days are for the fun stuff — the accessories that make the car feel like yours. None of these are urgent, but they add up to a noticeably more polished ownership experience.
Rear Spoiler
The Juniper's redesigned liftgate has a cleaner profile than the previous Model Y, but it's also flatter — which makes a spoiler more visually impactful. The BASENOR OEM-style spoiler uses ABS plastic with a carbon fiber texture finish (not real carbon fiber — important to set expectations). It mounts with 3M VHB adhesive tape, so no drilling is required, but you'll want a warm day (above 60°F) for the tape to bond properly.

Install note: Clean the mounting surface with isopropyl alcohol first. Apply the spoiler, then let the car sit in a warm garage for 24 hours without driving. This gives the adhesive time to fully cure. If you apply it in cold weather, use a heat gun or hair dryer to warm the mounting area to at least 60°F before pressing the spoiler into place.
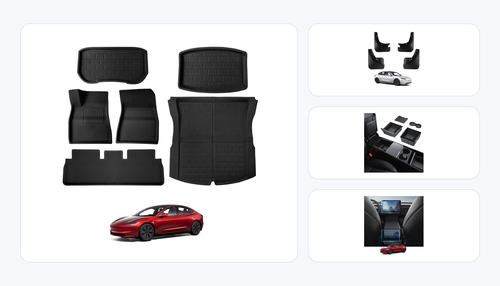
Bumper & Trunk Protection


The rear bumper guard is one of those accessories you won't appreciate until the first time you slide a heavy box into the trunk. Without it, the bumper lip accumulates scratches within the first month — especially with Costco runs. The TPE material is thick enough to absorb contact and flexible enough to match the Juniper's rear bumper contour.
The trunk storage bins transform the Juniper's flat cargo area into organized compartments. The carpeted lids sit flush with the trunk floor and double as a second-level surface when you need to stack items without them rolling around. The two-piece design means you can use one bin for groceries and leave the other side open for larger items. Each bin has reinforced walls that prevent collapsing under load, and the carpeted lid texture matches the Juniper's factory trunk carpet — so when the lids are closed, the bins are virtually invisible. This is one of those accessories that sounds trivial until you experience a week of groceries sliding from one end of the trunk to the other every time you take a turn.
Pet Accessories
If you travel with a dog (or plan to), the pet seat cover is worth installing now rather than waiting for the first muddy paw disaster.

The hammock-style design converts the rear seat into a contained area — your dog sits on a waterproof surface, and the hammock prevents them from falling into the footwell. Four anchor straps hook onto the front and rear headrests. This cover fits all Model Y vehicles from 2020-2026, including the Juniper.
Day 6-7 Summary
| Priority | Accessory | Price | Install Time |
|---|---|---|---|
| Cosmetic | Rear Spoiler — Carbon Fiber Texture | $89.99 | 20 min + 24h cure |
| Practical | Rear Bumper Guard | $49.99 | 5 min |
| Practical | Trunk Storage Bins | $89.99 | 1 min |
| If you have pets | Pet Seat Cover Hammock | $39.99 | 3 min |
Week 1 Software & Settings Setup
Between installing accessories, spend 20 minutes dialing in your Juniper's software settings. These settings aren't obvious from the manual, but they significantly improve the day-to-day experience.
Essential Settings to Change on Day 1
- Stopping Mode → Hold: Controls → Driving → Stopping Mode. Set this to "Hold" so the car stays put when you stop — no need to keep your foot on the brake at red lights. This also enables true one-pedal driving.
- Regen Braking → Standard: Controls → Driving → Regenerative Braking. Keep this on Standard — it maximizes energy recovery and gives you the characteristic EV one-pedal driving feel. The "Low" setting wastes energy and makes the car feel sluggish.
- Mirror Auto-Fold → On: Controls → Vehicle → Mirrors → Mirror Auto-Fold. Your Juniper's mirrors will automatically fold when you park (if parked in a tight garage, this prevents mirror strikes).
- Close Windows on Lock → On: Controls → Vehicle → Close Windows on Lock. If you forget to roll up a window, the car will do it when you walk away. Saves you from rainstorms and curious passersby.
- Joe Mode → On: Controls → Safety → Joe Mode. This reduces the volume of chimes and alerts by about 50%. Named after a Tesla owner named Joe who requested it for sleeping kids in the back seat — useful for everyone.
Autopilot & FSD Settings
If your Juniper came with Enhanced Autopilot or Full Self-Driving, configure these during your first week:
- Following Distance: Set to 3 or 4 car lengths for comfort (Controls → Autopilot → Following Distance). You can always adjust with the right scroll wheel while driving.
- Speed Offset: Set how fast Autopilot drives relative to the speed limit. Most owners use "5 mph offset" or "percentage-based +10%."
- Navigation on Autopilot: If you have FSD, enable this for automatic lane changes and highway exits. Start with "Require Confirmation" mode until you trust the system.
Tesla App Features to Set Up
Your phone is your primary car key. These app features are worth configuring during week 1:
- Scheduled Departure: Set your daily commute time and the car will precondition the cabin and battery so everything is warm and ready when you leave. This is especially valuable in cold climates — it uses grid power (not battery) to heat the cabin while plugged in.
- Phone Key Priority: If you carry both the phone key and the card key, the phone takes priority. Consider keeping the card key in your wallet as a backup in case your phone battery dies.
- Notifications: Enable "Climate Keeper" alerts so you're notified if the cabin temperature exceeds safe thresholds (critical if you leave pets or children briefly).
The "Skip Until Later" List
Not everything needs to happen in week one. Here are accessories that are genuinely useful but can wait until month 2 or 3 without causing any damage or inconvenience:
| Category | Why It Can Wait | When to Buy |
|---|---|---|
| HEPA Cabin Air Filter | Your Juniper comes with a fresh factory filter. No need to replace until 6-12 months of driving or after exposure to wildfire smoke. | Month 6-12 |
| Wheel Covers / Rim Protectors | Cosmetic only. No functional urgency unless you're scraping curbs regularly. | Month 2-3 |
| Side Window Sunshades | The roof sunshade handles 80% of the heat issue. Side shades are for rear passengers on long trips. | First road trip |
| Windshield Sunshade | Important in summer, but not urgent if you park in a garage. Buy before the first heat wave. | Spring/Summer |
| Floor Mats | BASENOR does not yet have Juniper-specific floor mats (in development, expected Q2 2026). Tesla's included mats work fine temporarily. | When available |
| Phone Mount | Useful but the Juniper's wireless charger and touchscreen navigation reduce the need. | Month 1-2 |
| Car Cover | Only needed if you park outdoors without a garage. Not relevant for most new owners. | If parking outside |
Total Cost Breakdown
Here's what the full 7-day setup costs, broken down by tier:
All prices include free US shipping. BASENOR also runs periodic bundle deals on the Juniper collection page — check there before placing individual orders.
Frequently Asked Questions
Sources & Update Log
Last updated: March 2026 — Initial publication covering the 2025-2026 Tesla Model Y Juniper first-week setup.
Sources:
• Tesla Official Model Y Page — Juniper specifications and features
• Tesla Motors Club — Juniper Owner Impressions — Real owner delivery experiences and tips
• Tesla Motors Club — Paint Depth vs. Other Cars — Independent paint thickness measurements
• BASENOR internal testing data — 3D laser scanning measurements, 1,000+ hour product endurance tests
• Temperature reduction data measured using FLIR thermal camera at BASENOR test facility (ambient: 95°F, direct sun, 60 min exposure)
Methodology: All product recommendations based on 500,000+ cumulative BASENOR customer orders, filtered for Juniper-compatible products only. Prices accurate as of March 2026.
Ready to Set Up Your Juniper?
Shop All Model Y Juniper Accessories
Every product listed in this guide is in stock and ships free to the US. Most orders arrive within 3-5 business days.
Shop Juniper Accessories